Thursday, 16 May 2013

FMP Update


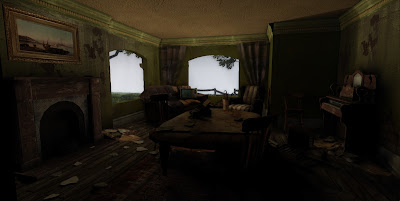
I've changed the lighitng in the living room area. Before there were large patches patches of darkness which i struggled to fix by changing the number of bounce lights and global illumination. Instead I moved and added candles to brighten up areas. It also gives a nice gradient of colour from left to right

Planes of light have also been added to give a dusty, inhabited feel to the level


I also added a broken wall piece and modelled a brick reusing texture space from the tiling texture. Adding this mesh makes the broken wall piece more convincing


More broken wall pieces, creating a derelict, overgrown feel to the interior. 


I wasn't too happy with the hallway as it wasn't that interesting. I've made it a little more dynamic by adding ivy which has made it's way into the house


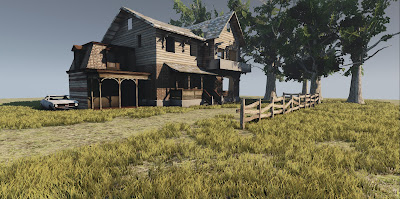
Apart from general tweeking and adding assets another change is to the fire outside. It's colour was too yellow but has now been made a little more red. 

Tuesday, 14 May 2013

FMP Progress

Haven't posted a blog for a while. Most up to date screenshots so far..


Exterior. Pretty much unchanged, added my own skybox the environment. There is also a very light rain


Hallway. There are now candles adding light to the house. I also faked some of the lighting by adding more lights to highlight the chair etc.


View from upstairs down


I also modelled another vehicle. Adding a start to the level, the player exits his car to explore the house. the lights are left on illuminating the shadowed areas of the house

Monday, 29 April 2013

FMP Progress

I've been working on the exterior to make it look complete and an actual playable level.


Area around the outside of the house. I made some bars of wood (re using texture space) and placed around the house blocking up windows, burning in the barrel and leaning against walls. Just like the interior is very cluttered, i wanted a similar feel in the front yard.


A small vista has been added also. As the house is a modular tileset, it meant i could easily replicate other houses in the area. I was also basing this environment from a scene from 'Shutter Island'


I also finally got around to finishing the roof. I made a few tiles using the texture from the slates i'd already made, then simply placed them accordingly. 

Monday, 22 April 2013

Ivy

I've decided to devote my time to developing the exterior of the house. Making the house seem delapatated, unkempt and derelict, I made some ivy branches to take over the exterior of the house. 


The method to create the vines is essentually the same process making the trees. Making a high poly leaf, attaching to a branch using the object paint tools in max and then baking down various maps to a plane.

I made 4 variations to ensure it never seemed repeated.


Vines as they appear on the house.

 I didn't want to densely populate the exterior, but have areas of concentration where nature has consumed the building. 

Monday, 15 April 2013

FMP Progress

Haven't posted a blog in a while so this update should show a fair amount of progress. The past couple of weeks or so I've been working on my asset creation to populate the house making it more interesting.


In hindsight I probably spent a bit too much time on a couple of these assets. Particularly the Box of matches which is a high-poly model baked down to a slopped plane in the box. (but I don't care it looks good)


Most of my time has been spent working on the living room as it was pretty much empty before. I've been using the cloth modifier (a lot) to enhance various assets. Curtains and draped over sofa's etc. As the modifier needs a very high poly base mesh to work correctly, I had to retopologise to create an acceptable mesh with a reasonable tri count.


On the left is the high poly version which is over 50,000 tris, on the right is the low poly version which is almost identicle using just over 600 tris. 


Wires from the two versions. Dramatic difference between the two. There were a couple of minor errors from the bake but these were fixed in Photoshop using a dust and scratches filter on a duplicated layer then masking out the errors.

Monday, 25 March 2013

Interior Progress

Carrying on the development of the interior I've made a few more assets and decals to add to the hallway area.

The decals/assets help to break up the tileable textures on the walls & floor whilst adding to the derelict feel of the house. I've tried to re-use texture space as much as possible so the broken tiles use a combination of materials from the white wall and the roof tile.


I plan to use these decals and materials throughout the rest of the level to achieve the abandoned/derelict feel I am going for.

Wednesday, 20 March 2013

Interior Progress

Recently I've started to put time into the interior of the building producing various textures for the walls and developing decals to place around the house to make it seem derelict.


This is the end of the corridor to where you find the stairway. The texture on the walls is pretty basic broken up by decals to add variety and interest to the level.


origionally i wasn't too happy with how the brick appeared on the wall as there was no shadow cast from the overhanging wall paper. To correct this i simply hand painted on the difuse where shadows would be cast.

A new texture sheet had to be made for the difuse, but still uses the origonal normal map with texturecoordinate nodes so it tiles correctly. 

I still need to make more decal variations for the brick and wall paper cracks.

Monday, 11 March 2013

Adam Make Fire


I wanted to add a little more life to my level and include light sources which aren't artificial. So I decided to add a barrel with a fire...


This is pretty much the final version of how the fire will appear in the level.


This is the material set up before it was used as a particle system. It consists of a lava texture with bump offset which pans through the fire to give it variation in the flames. I also added a panning  texture on the main flame so it isn't so obvious that the flame is just a repeated plane.


For the final touches I added a spot light, adjusting the colour and brightness to light up the area around the house. The warm colour from the fire is a nice contrast against the coldness of the environment. In game it also brings the level to life having movement

All I need to do now is to figure out how to make the light flicker, then I should be done!

Thursday, 7 March 2013

My day in Cry Engine

For some unknown reason, I've been constantly switching back and forth between UDK and CryEngine since the start of my FMP.

And today was yet another day where i decided to try and use Cryengine... again

My days effort inside the engine


I got so far, but realised my terrain was too large, tried to resize it, Cry glitched out. Then i gave up and returned to UDK.

 I do think however UDK looks better for my environment. Particulary the soft, ambient shadows generated on meshes and in corners from the baked lighting. I also know UDK better so I have decided to definatley stick with this engine!

My level as it currently stands


Tree Progress

Nothing too exciting. Progress so far of tree creation, as the ones currently in my level look shite!


^ High Poly branches which will eventually be baked down to a plane.

Wednesday, 6 March 2013

progress


The grass mesh has now been set up with the foilage tool in UDK and placed throughout the level


My next step is to replace the tree's with a new version, because I feel they're letting the scene down a little. 

Tuesday, 5 March 2013

Fences & Grass

I've been working on a couple of assets to include in the surrounding area. The fence is made up of a single post and  few vriations of horizontal beams, which all share the same tileable texture. Exported as single assets, allowed me to create alot of variation producing an old rickety fence.


The grass is a high poly bake onto a texture sheet following a tutorial.(speant almost two days just making grass!)

Although its not finished yet, im pretty pleased with the results. The planes have been vertex painted so they will (hopefully) seem as though they are influenced by a light breeze.

Belated blog post

Recently I've been working on getting the majority of the exterior textured. To get  idea of what sort of colour scheme i was going to go with i did an (extremely) rough paintover of the exterior.


Its not the prettiest piece of work, but it gave me a rough idea of what i wanted to acheive.

I wanted the textures to be of a decent quality so i decided to put a fair amount of time into them. I (so far) have 3 diferent tileable textures for materials, brick, wood and slate.


Each tile was sculpted in Zbrush from a mesh created in 3dsmax then baked down onto a flat plane. The difuse map was created from phototextures alobng side with the Ambient Oclussion and other maps created from the bke, then a final height map was created from this to add extra detail to the normal. .

I also have another wood variation which is applied to the building with the red and white pannels.


These are the textures as they appear n engine. Im pleased with the results however the normal mp doesnt ppear as strong as i'd like it too. Im going to hve to look into a thing called bump offset to get the best result...


Wednesday, 13 February 2013

FMP_Derelict House

Progress so far...

I've mainly been working on the interior, but have made a few changes to the outside of the house. 


The main changes are to the colour of the sun to match the time of day in which the shadows are being cast, more tiles added with window pieces and a few more fine details added to areas such as under the balcony & porch. 


I've mainly been focusing on lighting the interior today. Before the house was extremely dark with little to no light bouncing through the rooms. 


My first attempt to create dynamic lighting was to adjust the world and light properties. However there's so much that can be adjusted which meant every time the lighting was changed, it had to be re-baked so the efffects could be seen properly. (waste of time)


The best way it seems is to add point lights inside the building by windows. This way I get much more control manipulating the settings until I get the perfect light balance within the image.  


Monday, 11 February 2013

FMP - Derelict House W.I.P

First post related to my FMP, scary stuff...

The overall idea for this project is to make a derelict house rendered in game using the Unreal engine. For this project to be successful i need to use varying, convincing textures and also include good lighting throughout the level.

It took me a while to work out how i was going to build the house. I started of by physically building in max.


Turns out this wasn't the best idea. It was difficult to get the scale correct and was incredibly fiddly to model. From this point I decided to use a tileset.


This is the tile set so far which makes up the building. These pieces will be duplicated with varying textures and features such as doors and windows. So far however I've just been working out how these pieces will all fit together.


This is the house so far. My plan is to get the exterior whitebox finished before i start texturing.